how to build a van kitchen - lessons in mindset

A childhood spent on sailing boats has left me with an affection for galley kitchens, enamel wear and moving from place to place to camp. Whilst boats don’t fit in to our life right now, I’ve been sleeping in our van since we got it a couple of years ago. I have seen friends converting vans and dream of doing it, but aside from it not being realistic at the moment, I haven’t believed that I could actually do it.

The blog that gave the answers!
Over the Christmas holidays I was meandering around the Internet dreaming about van conversions and camping kitchens when I spotted an American concept – chuck box camp kitchens.
Pictured in wild mountain and riverside environments, these wooden boxes seemed to be the answer to my dilemma: a removable kitchen that could be filled with all the paraphernalia and provisions needed.
With memories of my Dad flooding back, I began to sketch out a design for my own camp kitchen before discovering a blog by Rei, a US outdoor store, about building your own camp chuck box. Complete with instructions and designs this was the answer to my prayers!
Step 1 – overcome anxiety and fears
Taking the Rei design and cutting plan, I phoned the local wood merchants who were able to provide and cut the wood to size. In a matter of days I had a neat parcel of wood in my hallway which, due to an overwhelming fear of getting started, stayed there for at least two weeks.
My mindset was completely frozen: I had spent a lot of money (approximately £80) on this wood and surely I needed exactly the right tools and skills to make the perfect box.
After a while, I realised that it was quite ironic that I was asking my clients to step outside their comfort zones every time I taught them mechanics online, yet I was finding a million reasons to avoid getting uncomfy making a box.
Eventually I ran out of excuses. I was fed up with looking at the pile of wood and parts, and my desire to create overcame my fear of failure.
Step 2 – order the hardware
Being mid-lockdown I ordered all the hardware (screws, hinges etc) online, which led to some interesting deliveries and nearly as many returns, until eventually I had what I needed.

Screws = a trip down memory lane…..
Opening the box of screws I had a rush of nostalgia for my Grandad’s shed. The shed had been full of boxes like these and tools hung on the walls (complete with lines drawn round them so you knew where to put them back).
I felt the comfort of a strong sense of connection with my childhood and interestingly, my inner Self.
Step 3 – go for it!
Mug of tea at my side, I began to sort the wood to see which bits would go together. Once again, my mindset began to wobble – I felt sick, my head ached and I took photos and procrastinated as much as possible, until I spotted what I was doing.
In the end, I just picked up a drill and started.

Organised chaos
Step 4 – build the shelves
A key part of the camp kitchen, the shelves provide a base for the cooker as well as cubby holes for utensils, chopping boards and crockery. It turns out this is one of the more exacting parts to construct requiring precision and balance as you glue and screw the central struts in place, while making sure the top and bottom shelf match.
Once I’d started, the nerves began to fall away. The rush of pleasure at seeing the box take life spurred me on and soothed the shouts of anxiety from my body and brain.

Placing the pieces together to make sure it’s right
Step 5 – build the box!
Shelves created it was time to construct the box itself. After the precision of the first job, this was bliss: simply glue, hold in place, drill guide holes and then insert screws.
The box is constructed of marine ply, a strong wood laminate. The downside being that if you don’t drill guide holes the laminate can split. I felt increasingly confident and competent as I swapped drill bits and inserted screws with ease – largely thanks to the array of electric tools I had amassed.

Shelving made and ready to fix in to the freshly created box
Step 6 – insert shelving
Installing shelves with their sides covered in glue, is a mucky business and before I knew it, I was face to face with the reality that my box was not going to be perfect! I hadn’t realised that there were sprays of glue along the inside of the box where I had manoeuvred the shelves into place and failed to remove them in time. Viewing them as a happy accident and one of those scars that tell a story, I accepted the imperfections. I found calculating the position of the shelves and drilling through from the outside to secure them in place, strangely satisfying.
Step 7 – everything changes with perspective!
While building the box it dawned on me that being not very tall, I may struggle to cook on the hob while the lower lid was extended as a work surface.
At first, I felt deflated and cross that I clearly ‘hadn’t measure it properly’ and ‘I should have anticipated that’ before realising that the magnetic closures on the lower lid, meant I could shut it away while I was cooking! It always amazes me how changing your viewpoint can easily solve problems that seemed disastrous moments before.
When I first ordered the hardware I smugly ordered what I thought were 180mm hinges for it, only to find I’d misread them and they were in fact 180cm! After laughing at my mistake I popped along to a local shop and got some less beautiful but correctly-sized hinges to use.
Drilling the hinges in place I had my first experience of splitting plywood. It was a sad moment, especially as the screws I was using were too deep for the shelving, but there was nothing to be done. Filing and sanding cleared the worst of the problems thankfully.
Step 8 – the lid
If you look closely at the centre of the upper lid’s front panel you will see an unusual looking screw. It is in fact a broken drill bit… No problem! By now, I was in full flow of accepting imperfections and the stories they tell!
This camp kitchen will be joining us on so many adventures, it felt like it needed personalising from the outset. I knew just the person - our friend Ginny a talented artist had been experimenting with pyrography (wood burning art). Ginny knows us well so I asked her to surprise me with a design for the lid.

Step 10 – finishing touches
The lid Ginny created was beyond my hopes and dreams – it encapsulated the mountains and the sea, all the places we want to visit with Shirley and the kitchen. A coat of oil sealant, side handles and clasps at the front completed the build.
The final joy was filling the chuck box: rendering it as efficient and homely as any boat’s galley could ever be. Every item has a purpose and a story. Nothing is there by accident: plates and mugs designed and made by another friend, Kate (aka Enamel Factory). A touch of France in colourful Laguiole cutlery. A birthday present from my in-laws - Opinel knives and block. I smile every time I open the lid.
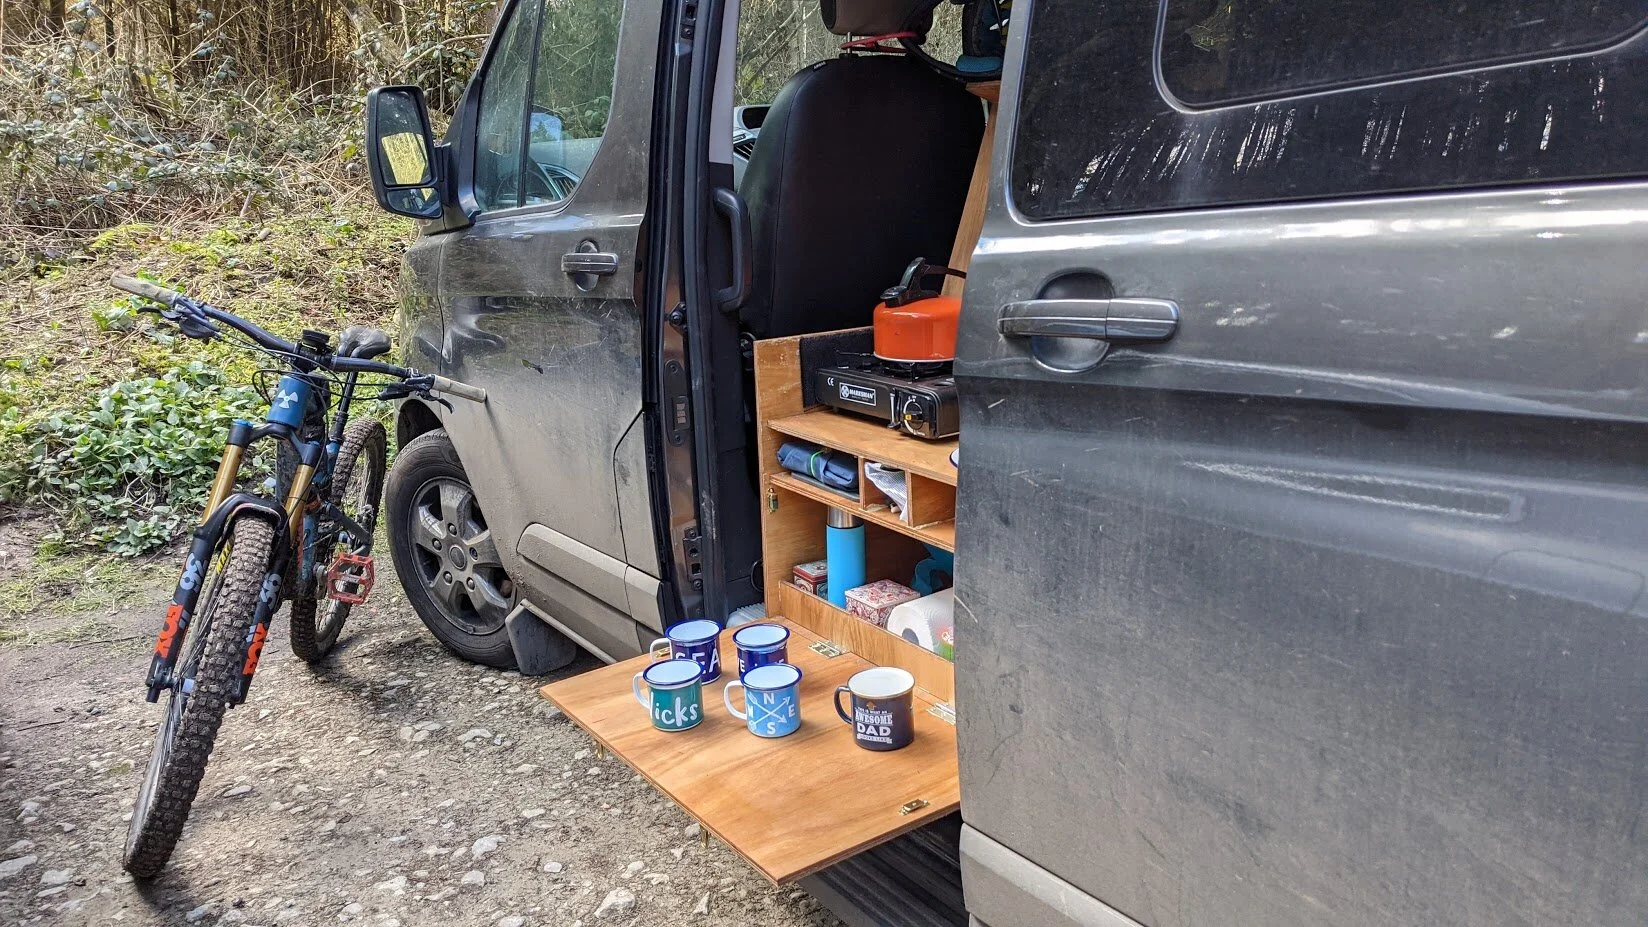
Trying out the kitchen after a play on the trails

As the Rolling Stones said ‘you might not get what you want, but if you try sometime you might find, you get what you need’ – I thought I wanted to convert a whole van, but actually what I needed was to create something that merged my need for adventure with the realities of family life: a camp chuck box!

I now believe that if/when the time is right I will have a lot of fun converting a van but for now, this wooden crate gives me all the freedom that I need.
I have a feeling that I will treasure it as much as I have the ‘My Little Pony’ that I made aged 10, when I wasn’t allowed a plastic one 😉.
Oh yes, I have a history of just getting on and making things, but that’s for another story!
Kit required:
Wood (cut to size by the timber merchants)
Screws and wood glue
Electric drill and screwdriver
Tape-measure and pencil
Close ups of the camp box:

Ginny’s artwork is so special

Clasps hold the lid in place securely

Two sturdy handles each side spreads the load for easy carrying

Full storage space - cooking, cutlery, utensils and crockery in the shelves; provisions below

Plates hide behind the mugs in the shelving

I’ve always dreamed of having Laguiole cutlery and love the vibrancy of this set

Frying pan, chopping boards and Opinel knives (perfect birthday present!)